Bullet Journal Setup: 5 Simple Step-by-Step Guide (Easiest Way)
Bullet Journal Setup Step-by-Step (The Easiest Guide)
You’re really excited about the bullet journal idea and want to get started right away!
But there are things holding you back:
- you’re scared of messing it up
- you have no idea how to start
- you feel like you have no right to start because your art skill level does not exist
The inherent beauty of the system is it’ll work even if you mess up; you can make it whatever you want it to be.
The system is simple and genius (more on this later) that it’ll work even for someone who has never used a planner regularly.
For someone who:
- has a million things going on in her head,
- wants to get her life (somewhat) organized
- and who gets anxiety just thinking about writing on the very first page of the notebook!
Can you relate?
Then, keep reading!
Don’t have time right now? Pin it to read later!
What Is a Bullet Journal?
The bullet journal was originally created by designer Ryder Carroll.
It’s an analog note-taking system that uses bulleted lists to quickly capture information.
It helps turn your chaos into something manageable and meaningful so that you can be more productive and effective.
It’s like a filing system for mental notes, post-it notes and napkin scribbles!
Most likely you’ve seen them on Instagram and Pinterest – just explore the hashtag #bulletjournal.
It became popular because of its flexibility and customizability. You don’t have to be an artist to have one.
Unlike a traditional planner or journal:
It’s a journal that works for you and with you!
What Goes in a Bullet Journal?
The original bullet journal system consists of the following four core modules:
- The Index
- Future Log
- Monthly Log
- Daily Log
However, Ryder Carroll highly encourages you to create your own pages which he refers to as Custom Collection.
What is a Bullet Journal Custom Collection?
A Custom Collection is a page (or pages) that consists of related topics.
Do you need to track your monthly expenses? Your food intake? Your monthly goals?
These are examples of custom collection pages.
You can create a page of collected ideas, notes, etc from your daily logs and put them all in one Collection page.
Why Should I Start a Bullet Journal?
The million-dollar question!
In other words:
What do you want your bullet journal to do for you?
A bullet journal is ideal for:
- Keeping your lists and ideas in one notebook
- Keeping a memory diary such as a travel journal, art journal, etc
- Organizing a household
- Organizing different parts of your life
- Planner
I didn’t have a clear purpose when I started my very first bullet journal.
I just got carried away by the hype I saw on social media and I just wanted to doodle and make something pretty.
I didn’t realize how powerful (and helpful) a bullet journal can be!
Before we begin setting up our bullet journal, let’s talk about supplies.
What Do You Need for Bullet Journaling?
Ignore the supplies of bullet journalers you see online.
I know they’re all fun and pretty.
But it can get complicated and you’ll get stuck down the rabbit hole of analyzing and figuring out the best supplies.
You don’t need them all!
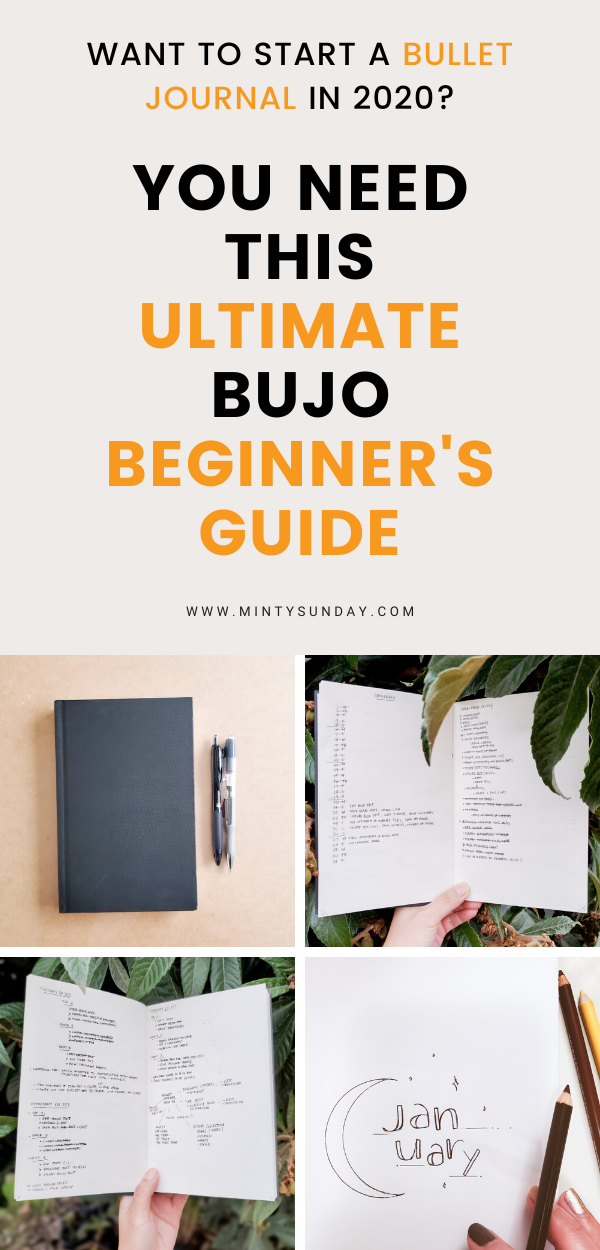
The Only 2 Things You Need to Start a Bullet Journal
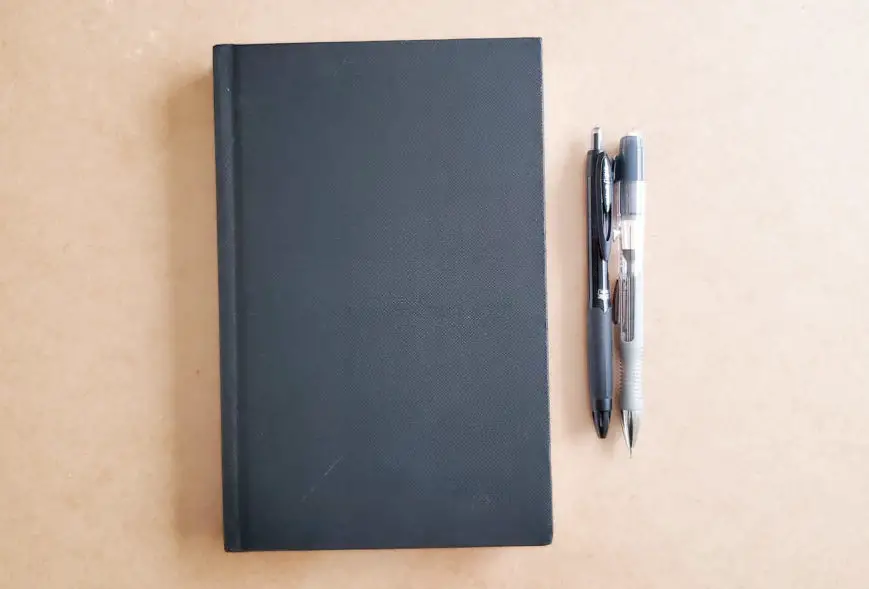
The most basic of bullet journal supplies you need are:
- Notebook
- Pen
That’s it! No art skills required.
Any notebook will do!
A popular bullet journal size is 5.5” x 8.5” but I can’t express this enough:
Use whatever notebook you have on hand!
Here are things you might want to consider when choosing a notebook:
- Size (for portability, etc)
- Paper weight (this is for thickness of the paper – for artists, calligraphers, etc)
- Paper design (dotted, gridded, lined or blank)
- Binding (spiral, case binding, perfect binding, etc)
Here are some popular bullet journals: Bullet Journal created by Ryder Carroll, Leuchtturm1917, Dingbats*Notebooks, Moleskine
How to Get Over the Fear of Starting a Bullet Journal Page!
The short answer is: use a pencil!
This way you can feel at ease knowing you can erase if you mess up.
Here are some more ideas on how to not get scared of messing up your journal:
- Don’t spend too much on your first notebook
- Use a notebook with lines, grid, or dotted grid so that you have a guide to keep everything look neat
- Skip the first page – I do this with all my notebooks. Somehow it helps to let go.
- Keep it simple – focus on function over aesthetics
- If you love pens then have a white-out correction pens handy in case you make mistakes or,
- Use cute washi tape to cover it up
- Use tools such as ruler (or any straight edge), stencils
- Use printables
How to Setup a Bullet Journal: 5 Easy Step by Step Guide
As stated earlier, there are 4 core modules in a bullet journal.
We’ll start with those and I’ll explain each module in each step.
Got your notebook and pen?
We’re going to set up our bullet journal first, then I’ll show you how to use it.
Step 1: How to Create a Custom Key/Legend Page

Ryder Carroll designed the bullet journal for rapid logging so that you can capture information quickly in a bulleted list form. He created symbols to identify each bullet point as task, event, or note.
The symbols are:
X complete
• incomplete
> migrated (to a Collection or Daily Log)
< migrated (scheduled in Future and Monthly Log)
O event
– note
* important
! idea or inspiration
Action Steps:
- Skip the very first page of your journal
- Using the second page, create a legend for the symbols above.
- Done!
Personal Notes:
Crossing out things is very satisfying for me – it’s my reward for completing a task but it’s also a way to tell my brain to not focus on that item. So, tweak the symbols that work best for you.
I also like using sketchbooks because of the thick paper for drawing and water coloring.
Step 2. Bullet Journal Index
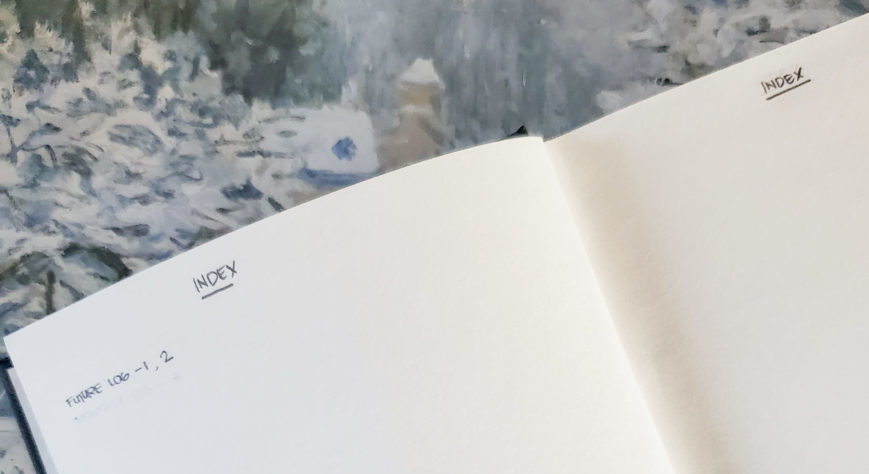
The index is the Table of Contents page of your journal.
This is one of those “I wish I thought of this!” kind of thing because it’s genius.
If you use a notebook for everything, even for school notes, it’s difficult to find the stuff you need.
But if you have an Index, you can quickly access those contents!
I don’t recommend writing the page numbers of your entire notebook. It’ll take too long!
The easiest way:
Every time you use a new page,
- Write the page number somewhere on the bottom corner (or wherever you want)
- Add the topic or title of that new page to your index with the page number
- This is how it would look like:
- Quotes Collections, 6-10, 15
- Books to Read, 11
- June, 13
- This is how it would look like:
Now let’s create the Index page:
- Take next 2 pages of your notebook (you can add an extra if you need to)
- Write Index as the title of those pages.
- Done!
Step 3. Bullet Journal Future Log
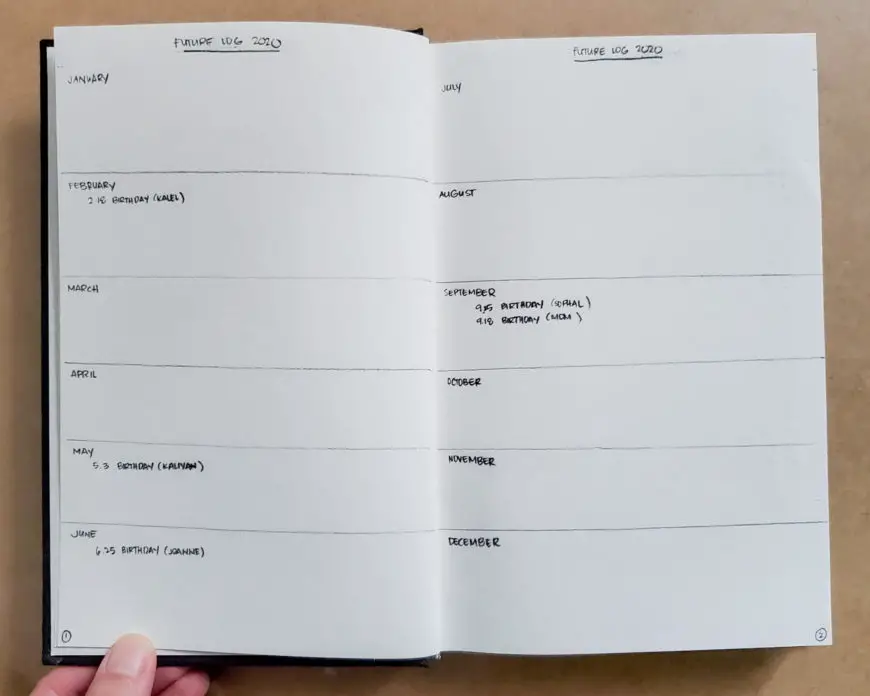
The Future Log is basically your one year calendar at a glance.
This is a good place to add birthdays, important dates/events/deadlines, appointments, days off, vacations, etc.
You can even map out your entire year here!
But for now, let’s keep it simple and just add important dates like birthdays and appointments.
Here’s how to make the Future Log:
- Take the next 2 facing pages of your notebook
- Number those pages
- Divide each page into 6 equal parts with a horizontal line
- Write the name of the month for each section
- Update your Index
- Done!
Note: I made this really small because we’re still in the testing phase but adjust to your needs accordingly. Not a lot goes here in the beginning however, we need this in case we have things come up to schedule months ahead.
Step 4. Bullet Journal Monthly Log

The Monthly Log is your monthly calendar page.
It’s designed to see everything you need to do for the entire month.
Don’t worry if you don’t have your month planned out! Isn’t this why we need a bullet journal?
There are many ways to create this page, and maybe you can experiment with other formats later on.
But, Ryder Carroll’s design of the Monthly Log is genius and really simple.
So, let’s make our Monthly Log!
- Take the next 2 facing pages (so that you can see both pages at once)
- Number your pages
- Write the Month name as the title of the pages
- On the left page, write the dates of the month (see photo above)
- Update your Index
- Done!
The left page serves as the monthly calendar so that you can see your month at a glance.
The right page serves as your “brain dump” where you can write down all the things you want/need to complete and then organize and prioritize with the calendar!
Step 5. Bullet Journal Daily Log
The Daily Log is where we plan our day!
You can do this the night before or the day of.
This is where capture notes, ideas, memorable things and to-dos – really anything worth noting for you!
I highly recommend to set up your Daily Log as you go because you may not have enough room for everything you want to write down if you set it up ahead of time.
Here’s how to create the Daily Log:
- Take the next page
- Number that page
- Write the Day and Date as your title (ex. Monday – 1.21)
- Done!
And we’re done setting up our very first bullet journal!
How to Use the Bullet Journal?
I admit I didn’t have my week planned out!
Can you relate?
We all live a busy life having responsibilities in different parts of it.
Every.single.day we seem to have like a million things to do floating in our heads!
But we end up feeling like we accomplished nothing at the end of the day.
We need to dump ALL of those things and then organize and prioritize them.
This why bullet journaling is genius because the system automatically helps you plan out your week and even an entire month!
You’ll realize this once you start using your journal, I promise!
The One Trick You Can Do to Stay on Top of Your Daily Tasks!
I added a few small things to the original design. This helps me laser-focus on my tasks but also trick my brain to not get overwhelmed. I learned that focusing on just the top 3 of my daily tasks help me get them done compared to seeing 10-20 things on my list.
Then, I realize that some tasks don’t take long. You must realize this yourself though. So time yourself when putting a load of laundry away and you’ll see that it doesn’t take that long!
Let’s start using our bullet journal!

You can start this brain dump ANY TIME, it doesn’t have to be in the beginning of the month.
Let’s brain dump:
- Go to your Monthly Log
- Take the right side and dump every single thing in your head right now marking each bullet point accordingly using symbols we created on the Key page, things like:
- ᴼ mom’s birthday next week!
- · clean bathroom, so disgusting
- · call boss asap
- – need milk!
- *ᴼ report due Tuesday! (note the signifier I added here)
- ! “If you don’t like where you are, move you’re not a tree!”
- Scan your Future Log for anything that needs to be done this month- add that to the list
Let’s organize:
- Migrate everything that has a due date for the following months to the Future Log (Now those things are scheduled!)
- Migrate everything that can be added to a Collection Page such as a running Grocery List
- Create a Custom Collection page by using the next pages, you can skip pages if you want as long as it’s in a new page.
- Don’t forget to number the page and update your Index.
- Migrate everything that can be done in the next few weeks in the Monthly Log (Those are scheduled, too!)
Let’s prioritize:
- Using your first Daily Log and referring to your brain dump page, Monthly Log, and Future Log:
- Write the “Top 3” Important tasks you must complete today
- Write the “Quick 3” easiest tasks (ones that take 5-10 minutes to complete)
- Write the “Next 3” top tasks you can do in case you complete your top 3
- As the day goes on, cross off your completed tasks, take notes and ideas, doodles, etc!
Start a new page or continue on to the same page for the next day and follow the steps on how to use the Daily Log regularly.
Here’s how to use your Daily Log regularly:
- Scan yesterday’s log to see if there are tasks you didn’t complete but want to add to today’s list
- Now is a good time to reevaluate those tasks (do you really need to complete them or can you let them go?)
- Organize yesterday’s notes
- add it to a collection page) or
- get rid of the ones you don’t need (maybe cross it out)
- Check your Monthly Log and Future Log for anything you need to complete today
- Add things your tasks lists (if there’s any at the moment)
- As the day goes on, you can:
- cross off your completed tasks
- take notes
- add more tasks, ideas, doodles
Revisiting and migrating those tasks daily force you to reevaluate them. Categorizing those tasks for your Top 3, Quick 3, and Next 3 makes you reevaluate even further!
The more we do this, the more we can get laser-focus on our goals because we are more mindful and aware of the things we do on a daily basis.
And eventually, we can use the bullet journal to plan out your entire year!
This is the power of the bullet journal!
I highly, recommend following this system first because you’re still in the testing phase.
Why? Because it works!
Use it as your foundation and then add or take away anything that doesn’t work for you once you get the hang of it.
You can then get fancy, artistic or as elaborate as you can. Anything goes from there!
Here are other questions you might be wondering.
Can You Make a Bullet Journal with Lined Paper?
Yes! Anything will do but having a notebook is ideal to keep papers organized.
Can You Start a Bullet Journal in the Middle of the Year?
Yes! This is the genius of a bullet journal, you can start whenever!
How to Set Up a Bullet Journal – Final Notes
Because of all the pretty bullet journal pages that are shared online, we often miss what bullet journaling is all about:
A bullet journal is designed to work even if your handwriting is chicken scratch!
The pictures I’ve posted in this blog post are mine – as you can see they’re not pretty – I even use pencils most of the time!
Here’s a quick summary of the steps to set it up:
- Create a Key/Legend page for your symbols
- Set up your Index (it’s like a table of contents)
- Set up your Future Log (a year at a glance)
- Set up your Monthly Log (a month at a glance)
- Don’t set up your Daily Log as it should be done as you go to make sure you have ample space for each day.
- To start using your journal, do a brain dump and organize and prioritize!
- Choose your Top 3, Quick 3, and Next 3 tasks to complete
- Use it regularly to laser-focus on your goals and tasks list!
Here are some popular bullet journals: Bullet Journal created by Ryder Carroll, Leuchtturm1917, Dingbats*Notebooks, Moleskine
If you’ve never kept a consistent diary or planner before, I highly recommend starting a bullet journal as simple as possible until you get into a habit of using it daily.
I mentioned at the beginning of this post that I quit after 2 months of using the bullet journal. I restarted and set up my bullet journal exactly as I’ve demonstrated in this post. I’ve since customized my journal to make it work for me.
One last important thing before I end this post.
No matter how powerful a bullet journal is:
I know you’ll discover the power of a bullet journal, too and help you achieve your goals beyond anything you’ve imagined!
Good luck!
xx, Glenda
Over to you! What made you want to start (or even consider) a bullet journal?
Enjoyed this blog post? Don’t forget to share it with your friends and follow me on Pinterest!


One Comment